Sunday, July 20, 2014

Identity Jump in SQL Server 2012 and its resolution

Sometimes a new feature added in a product may affect an existing feature in it. One of such scenarios is Identity Jump in SQL Server 2012. This is affected because Microsoft introduced Sequences in SQL Server 2012 upon the request of so many users. I didn't know about this until one of my cousins pointed it out. Then I went on surfing about this in various blogs.

Let's have a look about this...

Create a table and insert some values in it like below,

USE AdventureWorks2012
GO
CREATE TABLE TEST_IDENTITY(ID INT PRIMARY KEY IDENTITY(1,1),NAME VARCHAR(100))
GO
INSERT TEST_IDENTITY SELECT 'A'
INSERT TEST_IDENTITY SELECT 'B'
INSERT TEST_IDENTITY SELECT 'C'

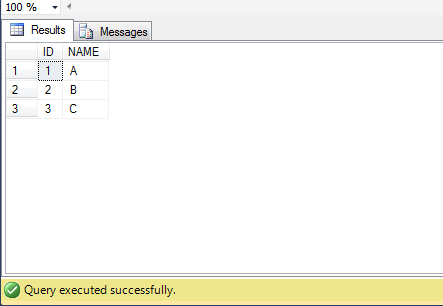
Now run a SELECT query and see the data in it.

SELECT * FROM TEST_IDENTITY


Now, go to SQL Server Configuration Manager and restart the SQL Server service. After it is restarted, insert one more row in the above table and run the SELECT query,

INSERT TEST_IDENTITY SELECT 'D'
GO
SELECT * FROM TEST_IDENTITY

You can observe there is a long jump in the value of identity... From 3 to 1002!!


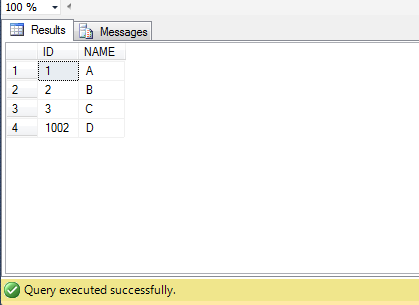
Here the data type of Identity Column is INT, so it jumped in thousands. If BIGINT is used then it jumps more long. This is a known bug for Microsoft. I tried installing all the updates of SQL Server 2012 released till now, thinking it might be resolved. There was a recent release to SQL Server 2012 named SQL Server Service Pack 2 in June, 2014 but this bug wasn't resolved. Instead some blogs claimed it as a feature. It cannot be considered as a feature because in production environments this may result in a dissatisfaction as services need to be restarted often.

There are two remedies for this issue. One is using the trace flag -T272 as a start up parameter and the other is using Sequences instead of Identity Columns. We'll see how both work...

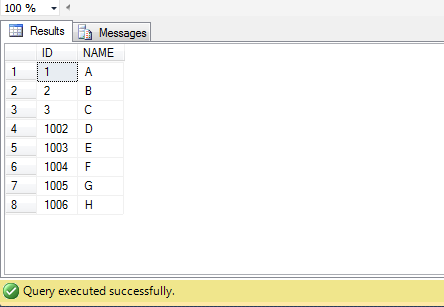
Using Trace Flag -T272


Add a trace flag as a start up parameter of SQL Server service. Go to SQL Server Configuration Manager and right click on SQL Server Service. Click on Properties and go to the tab Startup Parameters. Specify -T272 and click Add and click on Apply. Now restart the SQL Server service in order to have it effected.

Now insert some rows in the table as below

INSERT TEST_IDENTITY SELECT 'E'
INSERT TEST_IDENTITY SELECT 'F'
INSERT TEST_IDENTITY SELECT 'G'
INSERT TEST_IDENTITY SELECT 'H'

You can see that there is no jump in Identity if you run SELECT query against it...


To test it again, restart the service and insert one more row and run SELECT query against it...

INSERT TEST_IDENTITY SELECT 'I'
GO
SELECT * FROM TEST_IDENTITY


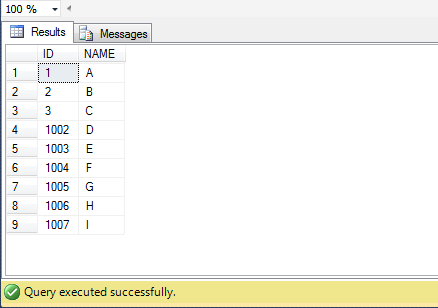
If you add the trace flag to your production server, you have to bear the jumps occurred till now but no more jumps will be occurred. When new tables are created, everything will be fine.

Using Sequences


Sequences are added in 2012 version of SQL Server. It is a database level object whereas identity is not an object and sticks only to the particular table. If a sequence is created then it can be used for any table across the database. Now, let's create a sequence for a table...

CREATE SEQUENCE dbo.SEQUENCE1
AS INT
START WITH 1
INCREMENT BY 1

Now create a table that uses values generated by this sequence...

CREATE TABLE TEST_SEQUENCE(ID INT PRIMARY KEY DEFAULT NEXT VALUE FOR dbo.SEQUENCE1,NAME VARCHAR(100))

Here in the place of Identity, we used the value generated for sequence as default value. Now insert some rows into this table and see how data is inserted,

INSERT TEST_SEQUENCE(NAME) SELECT 'A'
INSERT TEST_SEQUENCE(NAME) SELECT 'B'
INSERT TEST_SEQUENCE(NAME) SELECT 'C'
INSERT TEST_SEQUENCE(NAME) SELECT 'D'
GO
SELECT * FROM TEST_SEQUENCE


The data is inserted into the table as it gets inserted when there is an identity column. But there lies a disadvantage with Sequences. In the above table, we used the next value of the sequence as default value of the column. But you can know the next value of the sequence by running the below query...

SELECT NEXT VALUE FOR dbo.SEQUENCE1

After knowing the next value, insert one more row into the above table and see its data...

INSERT TEST_SEQUENCE(NAME) SELECT 'E'
GO
SELECT * FROM TEST_SEQUENCE


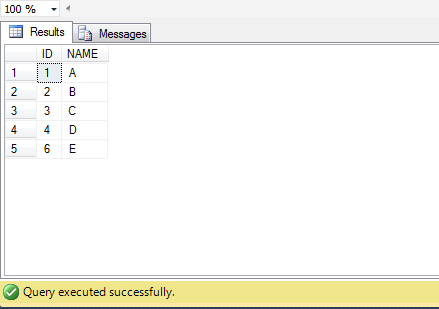
You can see that there is a value 6 is inserted because 5 had already been generated. This can't be done with Identity Columns if they work fine without any issue.

To know the basics of Sequences, read the official documentation of Microsoft.


Conclusion


According to me, in the production environments, Sequences can be used but they are not permanent substitution or remedy for Identity Jump Issue. Preferably, adding Trace Flag helps you depending on your requirement.

Hope Microsoft resolves this bug in the future!! :)

Saturday, July 19, 2014

Can't connect to local MySQL server through socket '/var/run/mysqld/mysqld.sock' (2)

The title of this post was the most bugging error for me while working with MySQL on Linux. I installed MySQL Server 5.6 on my Ubuntu system manually. Then I installed and configured MySQL Workbench. Then I restarted my system. When I tried to connect to MySQL Server through command line, I got the error,

Can't connect to local MySQL server through socket '/var/run/mysqld/mysqld.sock' (2)

This means the service MySQL is not running on system and it has to be started. So I tried starting the server with the following command,

shell> sudo /usr/local/mysql/support-files/mysql.server start

Then I got a new error,

couldn't find mysql server (/usr/bin/mysqld_safe)

I understood that it is looking a wrong directory for mysqld_safe because I installed in another location. This can be set in the file my.cnf. It is located in the folder /etc/mysql/. I went to that location and changed the base directory and data directory locations in that file and attempted to start the server, but it was of no use.

I surfed a lot to find a solution for this problem but no blog suggested me the right one. May be, my search was wrong. Some blogs suggested to check whether the directory mysqld exists in the location /var/run/ so that the socket file mysqld.sock can be created while starting the server. Following this suggestion, I created a directory in the location /var/run/ with the name mysqld. Then I tried to start the service and it resulted in a new error,

Starting MySQL... ERROR! The server quit without updating PID file

I didn't know what to do with this error. I searched online for its solution. Many blogs suggested me to kill the process with the name mysql but it didn't help me. Getting frustrated, I removed and re-installed MySQL multiple times on my system. But nothing was fruitful.

Then I observed something. When I installed just MySQL Server, there was no file with name my.cnf in the directory /etc/mysql. It was created only when I installed MySQL Workbench. Before it was installed, the socket mysql.sock was created in the directory /tmp. So, as a last trail, I deleted the file my.cnf from the directory /etc/mysql/ using the following commands, as a root user,

shell> cd /etc/mysql/

shell> rm my.cnf

Then I tried starting MySQL Service with this command,

shell> sudo /usr/local/mysql/support-files/mysql.server start

Surprisingly, MySQL Service got started and I could connected to it through command line. The socket was created in the directory /tmp. Then I found the location of pid file by issuing the following query in the mysql command prompt,

mysql> show variables where variable_name like '%pid%';

Now my MySQL Server is working fine when connected through command line and MySQL Workbench too. Now I can start or stop the server and can play with it! :)

Friday, July 11, 2014

Installing & Troubleshooting MySQL 5.6 Enterprise on Linux

Though newer versions of Linux Operating Systems came up with GUI to help their users, Linux Commands have their own importance. One of such scenarios which I've undergone few days back is installing MySQL on Linux.

I had to work with MySQL on Linux Platform. The operating system given to me was Ubuntu 14.04 LTS. On Ubuntu, MySQL can be installed from the source with a single line command,

shell> sudo apt-get install mysql-server5.6

But I was asked to install MySQL Server 5.6.19 Commercial on the Ubuntu system. Then I downloaded it and tried to install. Though it comes with install instructions, it's difficult to understand the commands for a Windows user like me. Later surfing through internet helped me with the information from different blogs and documents. Thanking all of them, I'm compiling them in this post. In this post, I'll show you how to install MySQL Server 5.6 from a tar file downloaded. 

tar means Tape Archive. It was used in older days of UNIX where files are stored on tapes.

Installing MySQL Server 5.6


Download MySQL Server 5.6 from Oracle Website. As I specified about tar file, download the tar file which is compatible to your OS (32 bit or 64 bit).

After the download gets completed, unzip it.

Open Terminal and switch to Super User account with the following command,

shell> sudo su -

Authenticate yourself by providing your password and switch to root account.

Now copy the extracted .tar file to a location like /usr/local with the following command,

shell> cp <location of the file>/<Name of the file>.tar.gz /usr/local

After doing this, create a group with name mysql and a user mysql in that group. Note that naming the group and user mysql is not a compulsion, it's a convention. You can name them anything.

shell> groupadd mysql

shell> useradd -r -g mysql mysql

Here option -r specifies that a system account is created whose password never expires. Option -g specifies the initial group to which the user belongs to. There must exist a group which is already created.

Now go the location where the tar file is copied and it has to be unzipped to carry out the remaining part of installation. Run the following commands in a sequence,

shell> cd /usr/local

This takes you to the directory /usr/local.

shell> tar zxvf <Name of the tar file>.tar.gz

This command unzips the tar file. The option zxvf means z(unzipping), x(extract), v(print file names verbosely), f(the following argument is the name of file). The tar command is used to create, modify and access files of tar archive.

shell> ln -s <Name of the folder extracted from tar> mysql

In this command, ln means link. It means a link is created between source folder and target folder. This link should be created with an option. Here the link -s specifies that a symbolic link is created between the source folder (extracted tar folder) and the target folder (mysql).

Now a target folder is created with name mysql. Open that folder,

shell> cd mysql

shell> chown -R mysql .

In the above command, chown means Change Ownership. Here the ownership of folder mysql is given to the user mysql. The option -R specifies that this user performs operations on the folder recursively. Do not forget to run the command along with dot(.) at the end.

shell> chgrp -R mysql .

In this command, chgrp means Change Group. This means the folder mysql is now changed its group to mysql. As said above, the option -R specifies that group mysql performs operations on the folder recursively. This command is said to be the sister command of chown. Do not forget to run the command along with dot(.) at the end.

shell> scripts/mysql_install_db -user=mysql

If you observe the directory mysql, there exists a file with name mysql_install_db which contains a script. To install mysql, this should be executed. In the above command, it is executed with the privileges of user mysql.

If you're installing MySQL Server on your machine for the first time, here comes an error that a library libaio1 cannot be found. You need to install this library by using the following command,

sudo apt-get install libaio1

After this library gets installed, run the previous command again which starts installing MySQL on your system.

shell> chown -R root .

This command changes the ownership of the folder to root account.

shell> chown -R mysql data

This command changes the ownership of the folder data to user mysql.

shell> bin/mysqld_safe --user=mysql &

Here mysqld is the service of mysql. The '&' at the end specifies that the command before it should be run in background. The whole command means, the service mysqld present in bin folder must be run with the user mysql in the background.

Next comes an optional command which copies configuration file to a location in /etc folder,

shell> cp support-files/mysql.server /etc/init.d/mysql.server

Now MySQL Server is installed in your system

Connecting to MySQL Server 5.6


To connect to the above installed MySQL Server, 

Open Terminal and switch to root account by authenticating yourself,

shell> sudo su -

Go to the location where MySQL was installed,

shell> cd /usr/local/mysql/bin

Run the executable mysql with the command 

shell> ./mysql

This takes you to mysql command line. To check, run the following query which shows the databases present in the server,

mysql> show databases;

Troubleshooting MySQL Server on Ubuntu


MySQL is easier to install on Ubuntu and annoys that much too. Sometimes when machine is restarted or under any situation, you cannot get connected to the MySQL Server installed on your machine. When you try to get connected, it shows the following error,

Can't connect to local MySQL server through socket '/tmp/mysql.sock' (2)

This means server is not running at local machine unless you didn't do any changes in the configuration file. So, to start the service again, run the following command,

shell> sudo /usr/local/mysql/support-files/mysql.server start

To stop the server, replace start with stop in above command,

shell> sudo /usr/local/mysql/support-files/mysql.server stop

To restart the server, replace start with restart,

shell> sudo /usr/local/mysql/support-files/mysql.server restart

Now play with your MySQL Server on Linux. Hereby I thank all the bloggers who helped me with their educative posts.